Search This Blog

Tuesday, December 31, 2013

Weave a Snowflake Bookmark... Free Pattern!


Winter is still here! This lovely little snowflake bookmark will give you a nice winter project.


Carl Larsson, Young Girl Weaving


"Some people say life is the thing, but I prefer reading" - Logan Pearsall Smith

Who doen't need another bookmark?
When I travel around the country, I tend to stop at libraries, to find used books to read at my shows and sometimes check my emails. Plus, its a nice quiet place to hang out.
As an added treat, I pick up one of the free bookmarks at the main desk. Always colorful and fun, I can write on the back where and when I picked them up and they are a cheap, small and useful souvenir of the many places I have been.


Weave on your tape loom this blue and white pattern.


This pattern uses 46 Threads:
   23 Holes and
   23 Slots

Cut:
33 Blue Single Threads
26 White Threads (13 doubled)

In this pattern, the white threads are going to be the doubled pattern threads, and the blue threads will create the background. (Brown blocks will be Blue threads).


Pattern  Chart:

Pattern Draft:


Oops! This part 1 on the left was updated January 3rd, I left out a section!
I so apologize. Please reprint and try again!


New to Tape Loom Weaving or need more help? Check out my book, Tape Loom Weaving.... simplified at my web site: www.eastknollpottery.com or on Amazon.

The Tape Loom predates the Inkle... not that I don't like the inkle loom, but this year, put a little history into your repertoire at demonstrations.... make a Simple Tape Loom and wow your weaving friends with some fun bits of history!  Learn all about the fascinating history of  Tape Looms on other pages of this blog and in my book above!

Have fun... Be creative... It's a new Year!

Tuesday, December 3, 2013

Tradition of Carving a Tape Loom for your Sweetie


Years ago I found a crude paddle tape loom in my attic. It is just a plank of wood with holes and slots cut in for the heddle and  indentations to set between your knees.  It has holes and slots enough for 42 threads total. Then I met Roger about 8 years ago. Roger is Norwegian and lives in Minnesota where a lot of Scandinavians settled in the 1800s.  After seeing all his books on Scandinavian folk art, visiting the Vesterheim Museum in Decorah IA and meeting lots of other Scandinavian folk artists, I wanted to try out the elaborate patterns they wove.


Here in New England, we made simple practical bands to use as ties and trim. The Scandinavians love bright colors and took the patience to make elaborate bands. It would seem all women were weavers, knitters and sewers.  A girl learned these skills at a young age.

So a young Scandinavian man trained at a young age to carve wood and looking to please a sweet young girl, would carve an elaborate mangle board or tape loom for a chosen girl. He would sometimes carve her name and date or a little saying into the loom.  On presenting the loom to the girl, and if she accepted the loom, she accepted him and the courtship would begin.  However, if the girl refused the young man and his present, he would have to carve another one for the next girl.

Thereby the saying, "Beware of the man with too many mangle boards."


So, all you reenactors, weavers, crafters and romantics out there, why not carve a simple tape loom for your sweetie this Christmas, (or girls, get your sweetie to make one for you) there is still time!  If you google tape loom images you will find many ideas. None of them are perfect, none precise, all are beautiful and a cherished gift to hang on your wall when you are not weaving.

 Utstilt på Norsk Folkemuseum, Oslo. Norway


And if you are still not sure how to weave on it, you can check out my new instruction book, "Tape Loom Weaving... simplified", on Amazon or www.eastknollpottery.com

Life can be fun... go make it so!

Saturday, November 30, 2013

Green Mountain Vermont Bookmark on the Box Tape Loom


While in Vermont I got the opportunity to work on my Box Tape Loom. I made this one, my second loom after my blue paddle with the painting of George and Elizabeth Jeppe, my Brooklyn NY great grandparents.


The Box Looms are easy to make. All you need is a rectangular box from Michaels or the Thrift store, and attach a picture frame that has dowels inserted vertically.  Drill two holes in the back of the box, about an inch below the top of the box.  Insert a 3/4"- 1" dowel. Put a hole and pin in one side so it will not slide out, put a gear or wheel with cogs on the other side. Attach a stop stick with a bolt and wing nut and a stop for that.   Just look at the photo!  You do not need a front take up beam inside or the small slot hole, I use my back strap on this one too.  I also added a table break in the back so it will not slide toward me when tightening the tension. I tacked a piece of cloth to the beam which has a dowel to hold the warp threads, but that is optional.


And so I made this Green Mountain Bookmark!


Here is the pattern draft to follow. You can repeat twice or move the elements around to suit your own taste.


Thread Count: 38


Background:
Blue: 11
Yellow: 6
White: 12

Pattern threads: 9
Green: 6 doubled (12)
Red: 3 doubled (6)


Still having trouble using a tape loom?
Check out my new book... "Tape Loom Weaving... simplified"
available at Amazon.com or www.eastknollpottery.com
subscribe to my blog so you can see the next free pattern: Snowflake Bookmark for Christmas gifts!

Happy Weaving!


Wednesday, November 27, 2013

A Weekend in Vermont... Fiber Festival!


The Green Mountain Fiber Festival in Wilder Vermont

It snowed in Vermont last weekend! Fortunately, it snowed Saturday night, so I didn't have to drive far in the snow, as I came home Sunday night with clear skies and roads.  It was nice to have my first snow of the year in Vermont.  I haven't been up there in a couple of years.  I live in Connecticut and have roots in Springfield and Weathersfield, Vermont.  My great grandmother, Eunice Rumrill, was born in Weathersfield in 1869, and her dad, Horace, born in Springfield, VT in 1833, her mom, Lucinda Randall, in Rockingham, VT in 1838.  (Just a little plug for my genealogy project... anybody knows these families... let me know!) It is nice that I have a connection to Vermont.


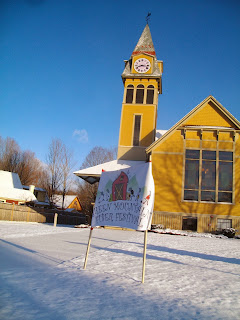
The Green Mountain Festival was sponsored by Karen at White River Yarns in White River Junction, about a mile or two down the road from this lovely old Congregational Church built in 1890 and now the Wilder Center. http://www.wildercenter.com/history/
The building is believed to have been copied from a previously existing church in Minnesota.

The building has a wonderful old pipe organ from the 1840s. 
http://www.wildercenter.com/history/george-stevens-organ/...

and a Seth Thomas clock made right here in Thomaston, Connecticut.
http://www.wildercenter.com/history/seth-thomas-clock/.

I set up my tape looms and weavings opposite that stained glass window and was bathed in colored sunlight for the two day event.


I sold my bookmarks, looms and how-to books to fiber enthusiasts and talked about the history of the tape loom, here and across the planet.


As usual, my miniature pottery was a big hit.  I was able to get ahead from my summer and fall shows and had lots of tiny face jugs and little piggy banks.


I also sold out of my large sheep statues and need to get going making more of these in January.

Two of the best things about my lifestyle is traveling to see other places and meet new people.

Michael
I met some interesting new folks at this festival. Michael Mc Harg, was here with his woven wooden baskets.  I also found out he makes bagpipes, so when I got home I looked him up and found his site, The Wee Piper.

He was at the show with his wife, Gisele. She makes the fiber art in the family. She has lovely hooked items as well as  knitted and crochet gifts.

Nice people.

Gisele

And, of course there were wonderful knitters, crocheters, spinners, weavers and a lady reviving Dorset button making.

Christiane


There are quite a few new friends I find travel to the same fairs and festivals as I.

I also met up with a fellow fiber person from the Massachusetts Sheep and Woolcraft Fair in Cummington, Massachusetts last May.  Below is Kate Bachus from A Hundred Ravens... she also is a writer.

Kate

Thanks to Karen for giving us an opportunity to sell our creations and share our love for fibers.
Karen and friend


If you missed this Fiber Festival, be sure to check out next years festival in Vermont. You are sure to find something you need and meet wonderful people.


Thursday, November 21, 2013

Fringe Twister you can make yourself!


I finally made a fringe twister myself. I have been traveling around to sheep and wool festivals, and no one sells fringe twisters.


You can twist the ends of your weaving or knitting projects by hand.  My good friend and weaver, Rosie, has a battery operated twister, but taught me the simple procedure.  Hold your work flat on a table with book on it or between your knees or pinned to your trousers to steady the weaving. Smooth out your ends and separate the first 4 threads on one side. (If you have an extra thread later, just add it to two threads to make a twist of 3). You take two threads between your thumb and pointy finger and twist them together in one direction till they start to buckle holding the twist with your other hand. Hold the ends of these between your ring and pinkie finger and take the next two threads and twist them together in the same direction till they buckle.  Now take the two newly twisted sets of threads and twist them together in the opposite direction. They will form a nice little rope and you can knot the end so it stays.  Licking the end of your threads helps a lot. Move across your piece.


Keep in mind, I am not a carpenter, electrician or joiner.  I also do not know how to solder, but soldering would be so much better I think!  This one does work though!

To make the yarn twister above, you need:

two alligator clips, Walmart automotive section or Radio Shack with hollow stems, 
two large electrical staples, Home Depot electric supply,
two blocks of wood, 3/4" x 1" by 3" (the above are a little smaller, but a little too tight for my fingers)
two beads with large holes for ends
8 tiny washers, Home Depot, 1/8" holes
Gorilla or two part epoxy glue

You also need a drill with 1/8" bit and a vise.

You need to drill holes in the wood blocks, centered 1-1/4" apart, making sure the two blocks of wood line up with each other. A drill press is much better than a hand drill as the holes will be straight and line up better. Carefully glue washers on both sides of your holes on each block.

I used a vise to clamp my electrical staple into and twisted one leg of each staple around with a hammer. I then had to put the whole staple back in the vise and clamp and hammer till both staples were lined up perfectly flat and even with each other. This is very important for them to move together later. Assemble to wood blocks and make sure they move before you attach the alligator clips and beads.

I assembled the gadget as above and glued the alligator clips on one end and the beads on the other end. Leave a little room next to each washer.

That's it!

To use, simply clip two threads in one alligator, and two threads in the other alligator.  Grasp the two blocks between your thumbs and pointy fingers and rotate in one direction. Remove two twisted sets and clip both into one alligator and rotate in the other direction.  So much faster!

Have fun, be creative!


Wednesday, November 20, 2013

Potter"s Marks


Until the 18th century, very few potters left their mark on their wares.  Pottery used to be more functional and utilitarian rather than fine art.  Sure, way back to the beginning of time, we potters put a little bit of ourselves into our pots, from shell and stick impressions to illustrations of the things around us and our interests.  But mostly, potters did not mark their pots because pots were just a tool, to use and then throw away.
Look closely and you can see H. BROOKS

Here in Connecticut, our local potter from Goshen, Hervey Brooks marked his pots. Between 1820-1860, Hervey made utilitarian redware pottery and stamped some of his wares with his name... H. BROOKS


Potters stamps were made from wood, metal or clay.
Old carved wood stamp

The famous South Carolina potter David Drake, known as Dave the slave, wrote his name directly into the side of his pot, just as I and many other potters still do.


Pottery stamps were not common until the 1800s when pottery factories started to mass produce wares for the growing demand, use of power equipment, need for unskilled jobs and ease of transportation of raw materials and finished wares.

Even in Europe, marks were not common until the 1700s.

Early Chinese potters stamp
Before the Ming dynasty (1368-1644) none of the underglaze blue or decorated porcelain items from Jingdezhen had any marks. Only during the Yongle reign (1403-1424), the reign of the third Ming emperor, white and blue porcelain made at the imperial kiln in Jingdezhen was marked for the first time.


Today, we look at the bottom of tea cups at antique stores to see the place it was manufactured... Made in China, Made in Austria.

Gebruder Heubach,  Germany
Some are stamped or drawn on with a brush with inks made of colored oxides and oils, some some are impressed into the clay and newer ones have a paper label.

Alamo Pottery - San Antonio and Hondo, Texas

Quimper, France

Gladding McBean & Co. - California


Reissner Stellmacher & Kessler (R St. K) 

Amphora Works - Turn-Teplitz, Bohemia


When I first started making pots in high school, I simply signed my name or initials, sometimes the date, and sometimes when it was ugly, not at all.  


When I started my own pottery company in 1986, I carved into plaster and made a clay impression that I fired to use as a stamp, a method I still use for special stamps, like the fish I used on my line of Christian cups or for the pots I make on my wooden treadle wheel. 


The original plaster mold and cast, a rooster logo, the name of my 1820s house, East Knoll, my address including the now absorbed into the city of Torrington, Torringford, (the original 1700s community I still live in) and the date 1986.  


I eventually had a metal stamp cast and still use that mounted on a curved piece of fired clay that makes stamping into firm clay easier.  I use my initials, RBD, Regina Britton Delarm on my bigger pots and EKP made of old type letters for my mini pottery. The date 1988  impressed with 4 circles from an ink cartridge. I stopped dating the pots in 1989 because wholesale customers thought their customers would not buy last years pots on their shelves.  Then time goes by quickly and those early 1986 TO 1989 stamped pots are now 25 years old.


So next time you check the bottom of a pot or porcelain for a mark, think of the little bit of history behind the stamp.


Friday, November 8, 2013

Five Woven Bookmarks in One Warping for your Tape Loom


Just finished a set of Five Bookmarks for Holiday Gifts. 


Warp your Tape Loom once and weave 5 bookmarks in one day. Each bookmark is about 6" long plus tassels.

This is a Baltic style of pick-up weaving on a simple tape or band loom.

You will need a loom with 38 threads, 19 holes and 19 slots.

Print out the chart below and the above finished bookmarks photo for
reference.

Warp your loom following the chart below with 6 foot warp. Leave
about 5-6 inches between bookmarks if you want to twist the ends.
Cut the bookmarks apart leaving 1/2 inch at the bottoms and the long
ends to be twisted at the top.

As with all pick-up weaving, start at the bottom of the chart working up.
Notice the dots placed in the middle thread at the beginning of each weave. The dots are shown because this row must have the 5 pattern threads on the top shed (dot thread on top), and the other four pattern threads on the bottom shed.


Happy Weaving... and an early Happy Holiday!

I will be happy to answer any questions... need more help? or are you a beginner? You can learn all the basics and advanced pick-ups with my book Tape Loom Weaving....simplified    at Amazon or my web site... www.eastknollpottery.com

Blank pick up chart
Blank stripe chart

Wednesday, November 6, 2013

The "Early" Potters of the Mid-West... Minnesota Clay


While looking into the history of pottery making in the Mid-West, Minnesota area, I am discovering some interesting things.
St Anthony Pottery, built by Kampff in 1860
probably the first pottery in Minnesota*

This is where the Kampff potter was... but no longer.
Immigrants from Germany and westward movers from New York State and New England, were just getting out here to Minnesota in 1850s. Perhaps the first potter in Minneapolis was Louis Kampff, from Hanover, Germany. He came to St. Anthony area of Minneapolis, built a long shed to work at making pottery in 1857 and then replaced it with a stone, 2 story factory in 1860.  He hired at least two employees, and began to make flower pots, garden vases and other terra- cotta wares. He used the red clay he found on his site.


I found another early potter who settled in the Red Wing area a few years before the famous Red Wing Pottery factory in Red Wing, Minnesota was built.  Joseph Pohl from Germany worked at pottery along with farming in a small turf covered shop on a treadle wheel using clay from his property. He made flower pots and crockery for his neighbors. The history books say he used stone ware clay, but the flower pots were probably red clay. The day I found the pottery site, the undergrowth in July was too dense to go digging around for clay... next time.  Minnesota has large amounts of red earthenware and buff stoneware clays.


Joseph Pohls pottery site... somehow his name got Americanized to John Paul
"John Paul's" clay pit with prickly brush on the side of a dirt road.
The story of the "John Paul" pottery and clay pit is told on a plac on Route 58 to Red Wing.

Chaska, a few miles south west of Minneapolis, made thousands of yellow bricks with clay dug out of pits, and yet red clays line the Minnesota river that runs nearby. I counted 7 potteries in the Minneapolis area by 1860. For the small population in the area and the time period (they were on the verge of industrial America), these 7 potteries made a lot of wares. The rail roads were being built and used at that time for transporting wares to other parts of the county. Transportation is one of the big changes from our small New England potteries that were produced by a family and some apprentices and sold to local folks, to the mass production that began around 1860 in factories that supplied thousands of pots per week across the county by freight.


Chaska Brick men, Minnesota
Chaska today has at least four large "ponds" formed by rain filling in the clay pits. I dug up a handful. Nice yellow color.

Chaska. Those ponds are actually clay pits... still full of nice yellow clay.

Red Wing Pottery is the most famous pottery in the area for its crocks and jugs.


The 70 gallon jug at left was specially made for display at the 1923 Minnesota State Fair. It is one of only three made and is the only one known to have survived. The jugs survival is an amazing story in itself. In 1994, the 70 gallon behemoth was found partially buried in a barn on the Turec estate in Milligan, NE. Mr. Turec collected steam engines and the story goes, he took a trip to Minnesota to buy a steam engine and saw this jug.  

One version of the story has him buying the jug for 50 cents. The second version has Mr. Turec being asked to take the jug if he wanted the steam engine. Either way that’s how it ended up in Milligan. When the jug was sold at auction the bidding was quite fierce, but Jerry prevailed and was fortunate enough to keep the jug in Nebraska. 

Compared to us in New England where potters started using the red clay near Boston, MA when they stepped off the boat from England in 1627, the potteries starting up in Minnesota were modern.

Industrial America wiped out the small time potters who had been working their trade for 250 years in America.

The mid-westerners jumped into the industrial age while the American Indian was still fighting for their land.

The clay is still there. Most of the big potteries and brick yards are gone. Americans can now buy pottery cheaper from China and beautiful brick buildings are replaced by concrete and metal.

Progress.

*http://www.streets.mn ... streets of Minneapolis then and now.