Search This Blog

Tuesday, January 17, 2017

Old Swedish Pattern on Band Loom with 3 Pick-up Patterns

Original... Topside and Reverse


(This could be Estonian or German!)


I saw this pattern on line somewhere and I just had to make it.  I had to carve a wider band loom to work it because the whole pattern uses 92 Threads, 46 holes and 46 slots.  After I made my loom, I found I still made it too narrow. My new loom uses up to 80 Threads, so I had to drop the 6 thread borders.


I like the colors. On the original you can see the 3 colors (plus white), red, turquoise and blue.

It is not so hard as it looks. It helps to follow the chart row by row and then you don't have to think about the 3 different sections...it will just all fall into place.


Close up with dotted border.


Pulling up that side red thread to show it more.
Pattern draft. Start at bottom.

When you get to the top of the chart you will have one extra white row in the side patterns because the two side pick-ups do not align with the middle pick-up.


My first attempt at this was so pretty that I cut it into sections and framed them.  My next attempt will include the side border dots. I am looking for a closer color match and I want all 3 colors in wool. Background white threads are cotton so the piece will not stretch.  As soon as I make a wider loom that is!


Happy weaving!

Monday, January 16, 2017

Weaving My First Rug!....Big Barn Loom... Part IV


Isanti County Fair, Cambridge MN


History is important. Working with your hands is important. Creating something of value is important. I have always loved history and seemed to have been destined to share historical trades with others. Old equipment was made by hands, not machines. They have been built to last, they have been worn through years of use by hands, feet and minds.  Finding this loom was especially wonderful because it too has a history. This is just some of the history of my Minnesota loom shared with me by Beverly, whose family owned it and used it for generations.

I met Beverly at a fair two years ago in Minnesota.  I was demonstrating pottery and a very nice gentleman was demonstrating rug weaving on his mothers old Swedish loom.  I am a practical girl. I thought making rugs on a beautiful old loom would be just the thing for my next endeavor.  Beverly gave me a call last spring and asked if I still wanted an old loom. Well, yes! of course!  Here is the story of this loom. It has a lovely history and a lovely story.

Christine Esberg was born in 1846 in Helsingland, Sweden. She married Olaf Peterson in 1866 and lived in Anoka County, Minnesota. Christine may have brought the very old carved pulleys with her from Sweden and perhaps made the frame here in Minnesota in the late 1800s.

Christine's mother Martha Esberg, used this loom too. They made rugs, somehow finding time while raising 11 children! The family remembers one particular large rug that covered Christine son Peter's floor. 
My Grandfather laid straw under this large rug and had the kids jump on the straw to mat the straw down for a soft base for the rug and to keep the floor warmer. This loom makes rugs about 36" wide and strips were sewn together to make the larger rugs. Peter's son Lester Peterson acquired the loom and brought it to his home.  Lester's daughter, Beverly, brought the loom to Isanti, Minnesota.  Sadly she had no room for such a large loom and she passed it on to me.  

Lester also told his daughter that the loom was passed from neighbor to neighbor so others would be able to make their own rugs. The hands of the Thompson's, the Nelsons, the Hansons, the Stromgren and Peterson family's have worked on this loom. The old tradition of using old clothing, coats, blankets, fabric that had worn out but was still valuable as a way to make lovely rugs to cushion your feet, brighten a room and keep out the cold. 

My house is very old and drafty too and in the winter the cold floors are covered in throw rugs. Throw rugs can be moved around and easily washed.  So the old tradition will be continued in a new family far from Sweden and Minnesota, here in New England. My family will now be making rugs from scraps of old fabric, wool, cotton, linen clothing and some new stuff too.  T-shirts and blue jeans make great rugs to brighten our rooms and keep the floors warm. 


                                          ↭↭↭↭↭


My loom was disassembled when I brought it home. There was one of these "sticks" which I am calling a lamm for lack of anything else. I cannot find a photo of one in any old photos of looms or ones in use.


I carved a replica and have attached them to my peddles and heddles.


They are working great!

My loom came with three old, well carved pulleys. Roger, wood turner, carved the fourth pulley last week.  In my hurry to just make a rug, I rigged up the loop system below. This is working great, but I hope to put in the new pulley soon.


Old and New pulleys


Here is Rogers new pulley... how perfect is that!


Thank you so much Roger! You're the best.


My cut wool strips stash.
I warped the loom with linen and wanted my first rug with some wool strips I had bought at a tag sale
years ago. They were wide, 1 1/2" and were probably intended for braiding.  This being my first rug ever, I just used what I had. The wool worked up fine, but the rug came out a little heavy.  I had some trouble with the sides. I had to keep adjusting the heddle height, the beater, the tension, loose warp threads. I am the kind of person who says, "lets just do it".  So here is how it turned out.


Rug #1.

Rug #2
I had some linen warp left on the loom, so I tried rug #2. This time I cut the wool strips in half, about 3/4". This was so much easier to weave and beat, and I like this one.

My next project is to set up the old pulley system.... upcoming part V. Right now, my bar system seems to be working just fine.

Happy weaving!


Monday, January 9, 2017

Warping the Big Barn Loom... Part III


Davis Family with Peter Tumbledown

Ready to weave on my big loom! But first, a story...
This is a photo of a sheep named Peter Tumbledown in 1910 on my very lawn.  This is the Davis family, Reginald and Winthrop Davis were twins, with their mom on the left and friend on the right, their family rented my house for a couple of years.

I have no idea if they had more sheep or if this was a pet. I don't know if they sheared their sheep or if they spun, wove or knit. But it is a great old photo.

My sister, Donna, did raise sheep. She raised, sheared, spun, knit and wove.  She came over to help me warp the Big Barn Loom the other day. I was so thankful for her help. I weave on a very small loom, a tape or band loom. Band looms are so easy to set up, usually 20-40 threads per warp and the warp has shorter lengths. On the Big Barn Loom, I am using a "found" newer reed that has 168 dents.  I had two spools of linen warp that was in my stash for years.  So we figured out we could make a linen warp about 13 feet long.


improvising on dresser drawer knobs

The lady who sold me this loom, Beverly, gave me a warping reel with the loom, but it is very big about 6' tall when standing. I am not sure where I will set it up, so my sister and I made our first warp on the long dresser I use to warp my tape looms.

It was hard to keep the cross in place, but she did it well, and we warped our first rug.


putting the cross on the original lease sticks

front to back warping.... going through the reed

threading through the string heddles center to right

halfway done threading!


tying on the back beam

ready to wind the back beam

Donna winding the back and...
Erin evening out the front
tying on the front beam

ready to weave... almost


Finding people to help and trying to figure things out means I have to use help when I can get it!  Donna, my daughter Erin and I got the threading done.  Before I can weave, I have to put new ropes on the heddles.  I have them hanging with jute cord, but something stronger is needed.  I also have only one original lamm, at least that is what I am calling the short stick I have that ties to the bottom heddle stick and then to the treadle.  One is missing so I am about to carve a replica.  Roger is back in Minnesota and has just finished the missing pulley.  The loom came with three very old pulleys.  We are going to need four to set up properly.    But for now the loom is warped.  And it looks great!
We are all excited about getting to the weaving part.

Sign up for my blog by clicking on the FOLLOW tab under my list of followers. You will receive an email when I post my next blog.  

Barn Loom Part IV
https://reggiesreenactments.blogspot.com/2017/01/weaving-my-first-rugbig-barn-loom-part.html

Thank you for sharing my love of weaving and old equipment!

Thursday, January 5, 2017

The Big Loom... Making String Heddles and Aprons.... Part II


The other day I finished making string heddles.  This is all new to me, so in my typical "let's just do it" frame of mind, I ignored on-line suggestions of using Texsolv cord and just used some heavy crochet cotton.  I am reading "Weaving Rag Rugs" by Tom Knisely, so I made the suggested 300 string heddles on my little jig,  However, my loom did not come with a reed but I have one someone gave me that is 30" long and has 168 dents.  So this is what I will experiment on. I have a lot of extra string heddles made.

I wound my cord around the end of my table which is 27" wide 75 ties and cut each end. I did this again so I would have a more manageable two bundles of 150 strings.


(On the center hold make the square knots with the first knot starting left over right and the second knot starting right over left. This will keep the center hole in the heddle from twisting).


I found the traditional size of the strings was 10 1/2" long, so I made my jig accordingly with headless nails in a scrap piece of wood.  The center hole is 3/4" long and this worked well later when I threaded the warp.


I bent the top nail a little so I could remove each heddle, square knots at the bottom of each center nail and a square knot at the bottom. Removed the heddle and draped it over a wine bottle.


Next, I strung a few on my heddle sticks and tied one end of the heddles together.  If you prop up the open end of the heddle sticks with a thick stick or similar object, you can easily slide the rest of the heddle strings on. Then tie the other open end of the heddle sticks together and for added safety, I ran a cotton cord along the top and bottoms just to make sure nothing was going to slide off.


I made an apron out of heavy canvas.  I measured the width of my loom beams, cut accordingly and made the back apron 40" long and the front apron 50" long. I folded and stitched the sides of each apron. I zig-zagged one end to be attached to the beam. I folded and marked triangular cuts for the bars on the other end.  I zig-zagged the holes, refolded and double stitched the pocket down for the insertion of the metal bar.

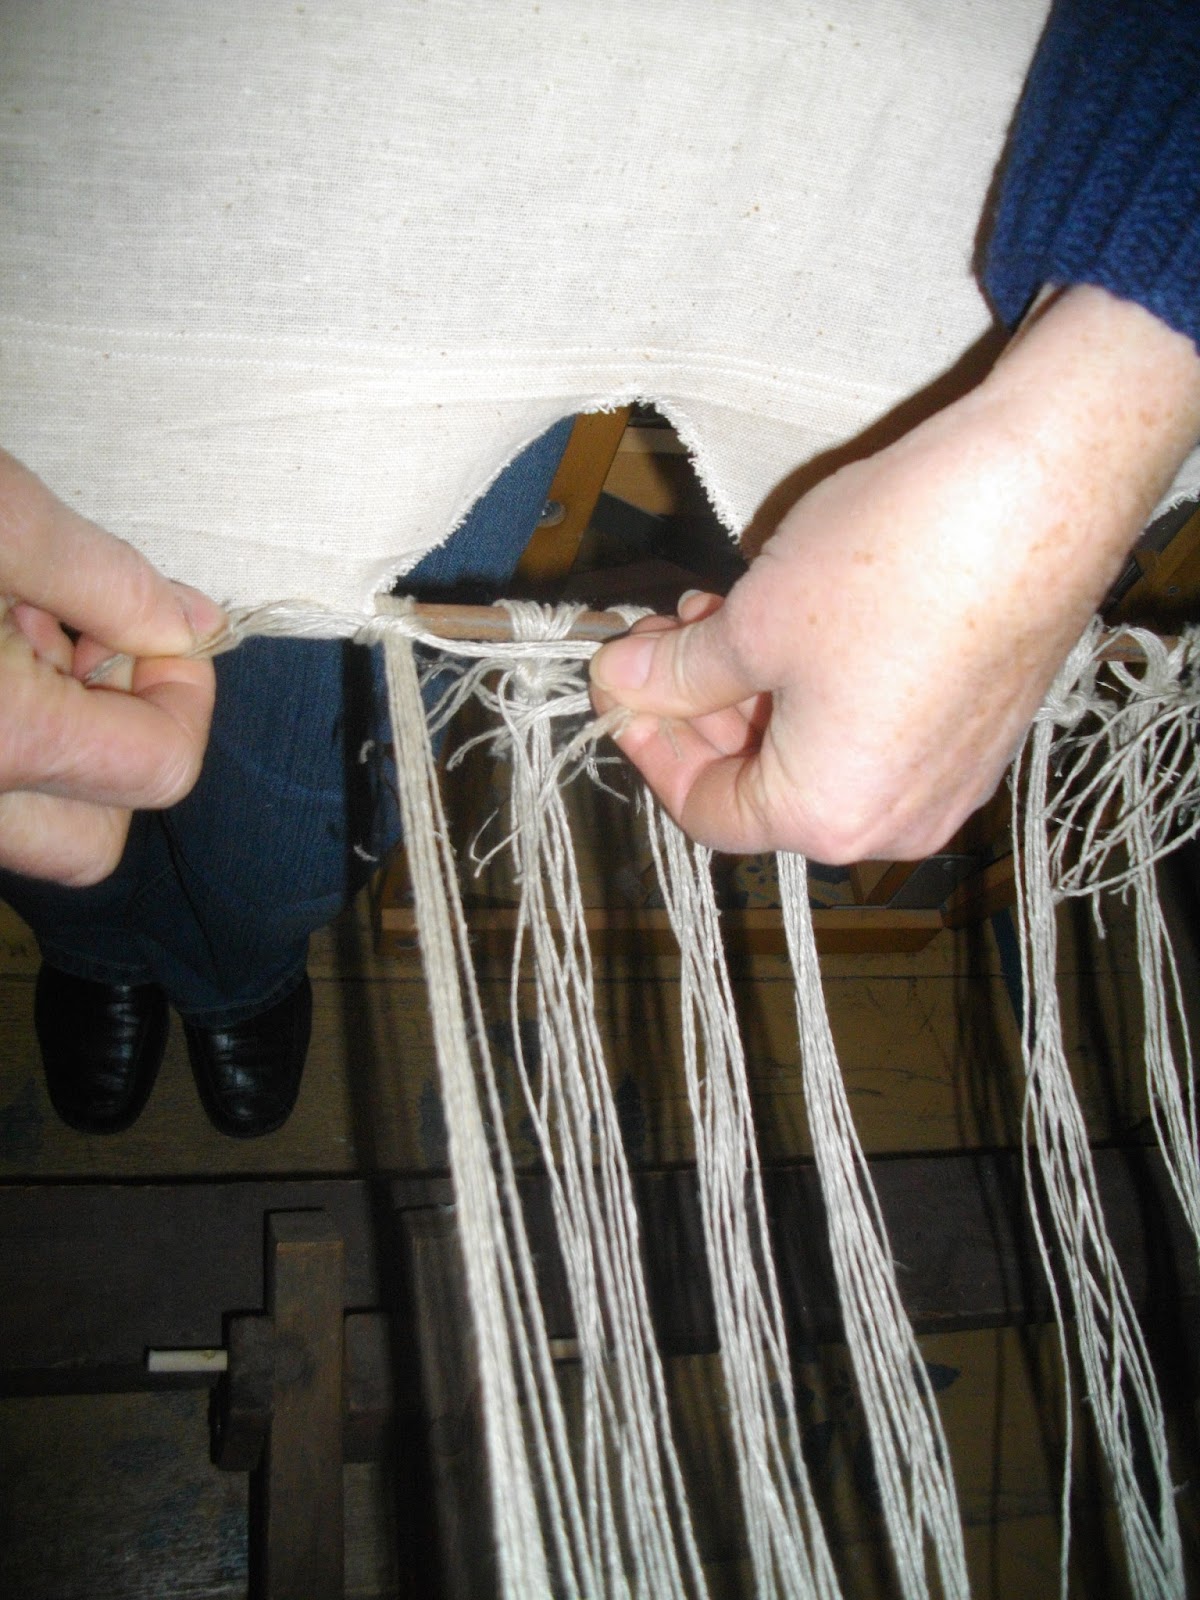
My loom had old cords tied into the four holes along each beam and no trace of an apron. I found other looms that had nailed an apron along the beam. My loom had no such nail holes and this loom also has grooves cut into each beam along side of the four holes cut across the beams.  I could not find any photos of old looms on-line that showed this groove, but I thought if I wrapped the end of my apron around a narrow stick 1/2" x 3/4", I could insert it into the groove and tie it in. Once I did this, I found it would stay in as I turned the beam so I did not need to tie it on.  I tied a cord around each end to make sure the stick would not pop out.


And now the aprons are attached. One finished heddle is temporarily hung while I think about the next step. How will I hang the heddles?  Roger is back in Minneapolis turning me a new pulley.  Why?  Well I will tell you all about the pulley system in my next post.

Sign up for my blog and I will send you an email when my next post is up!

Barn Loom Part III
https://reggiesreenactments.blogspot.com/2017/01/warping-big-barn-loom-part-iii.html