Search This Blog

Friday, December 18, 2015

Band Weaving Classes at The Vesterheim Museum in Decorah Iowa in February


Roger and I are invited back to the Folk School at the Vesterheim Norwegian-American Museum in Iowa again this coming February.

Last February, we offered a special Valentines Day couples weaving class. An unusual event, we had 8 couples attend and more on our waiting list. One member of the couple carved an old style Norwegian band loom by hand with Roger. The other member of the couple learned how to weave bands on one of my frame looms with me.  A two day class.  At the end of Valentines weekend, the carver presented the weaver with this special loom and the new weaver took it home to make the special bands.


Not familiar with band weaving? Bands of cloth were woven on simple small looms to create ties, ribbons and decorations.  Bright colors and elaborate patterns are easily woven on a loom that is small and portable.  Today, not only is it a fun craft to learn, but woven bands have a variety of uses. And the looms themselves are a wonderful work of folk art to hang on your wall when not in use.

Why a couples Valentines Day class event?

There is an old tradition in Norway. A young man who had his eye on a young woman would carve an elaborate loom with hearts, flowers and birds. Many times he would add her name and the date. He would leave this loom on her doorstep. If she accepted the loom, she would be accepting him. If she did not, he would have to carve a new loom for his next young woman.

Mangle Board
They also carved a special board called a Mangle Board as a betrothal gift. A mangle board is a board to press linen cloth. There is a saying that also applies to the band looms... "Beware of the man with too many mangle boards"... for he has had too many refusals.

We all worked together in a large Vesterheim classroom. The two days of work on carving looms was well worth the time spent.  The 7 men and one woman (yes we women can carve too), carved elaborate looms putting a little bit of themselves into each one.

The 7 women and 1 man (he was a great weaver already), learned the basics of weaving on this simple loom and quickly went on to weaving the more elaborate patterns.


And it was great fun!  The Vesterheim is a friendly place, we all interacted with each other and shared the experience together.

So we are going back!  I look forward to sharing this wonderful time with great people, a lovely museum filled with wonderful folk art and tools from local Norwegians and spend two days in a quiet little town in the farming country of Iowa.

Check out their web site and loom up the classes they offer, and sign up early for the Couples Class. We are sure to have a great time!

-Reggie

http://vesterheim.org

Can't get time to travel to Iowa in the middle of winter? There is still time to order my how-to book for Holiday gift-giving or for yourself on my web site or Amazon.com.

Tape Loom Weaving... simplified, will tell you how to make a simple loom and how to set up and weave your own bands.
www.eastknollpottery.com

And yes, I am a potter too!

Thursday, November 19, 2015

Miniature Pottery Sale... Holiday Gifts and my old High School

Add caption


I graduated from high school lets see... 43 years ago! So long ago. Fair visitors often ask me how long have I been making pottery, I tell them I started 45 years ago... at Regional #7 in Winsted CT. It sounds so cool that I have been making pottery for so long, and yet 45 years means I am getting old.

My love for pottery began with Kenneth Dyer the pottery instructor. I was 15, and I spent most of my free time playing with clay. Mr. Dyer played classical music on the record player as we worked. When I graduated, I took 2 semesters of adult night classes with him at the school. It was a chance to make pots at home too and he would fire them for me. Come June, he told me I was making too much stuff and I couldn't come back... "Go home and get your own equipment", he said. So I did.

I started with a kick wheel and bought a Paragon kiln the size of a washing machine from a little old lady who did paint your own pottery. I still have that kiln and it still works. Soon I realized that I had to find a style that people would buy. Loving history, I decided to make yellow ware. Yellow ware was made in England in the 1700s. They had lovely yellow burning clays with a beautiful feathery pattern. I sold yellow ware to gift shops, museum stores and went to trade and crafts shows for 30 years.


I started making mini pots when my two girls were young and had doll houses. One day while demonstrating at my first fair job, Goshen, I made some minis in front of folks and they said, "mm", "ah", "oh" and "wow". "They are so small!", "How do you make them so small". I inhaled the compliments and made more.

So now I am known as the "Reggie the Miniature Potter".  Which is fine. I still make yellow ware, but I sell thousands of this little pots across the country now and last year I ran out!  I love to make these little jewels, I can use a variety of clays, sometimes I did my own, I pick up clay across the county, people bring me clay too. My favorite is still the lovely yellow clays from the mid-west and our own Sheffield, Massachusetts red clay.


I glaze them with a variety of colors and styles... bright reds, soft browns, overlapping colors, sgraffito, slip decorated tiny drawings and mocha patterns. Vases for tiny flowers, face jugs, "fake" salt glazed crocks, dollhouse bowls and pitchers, tea pots, piggy banks... oh, there is no end to what can be made small!


So here is your last chance this year to see my new batch and take one home. I made this batch while demonstrating on my wooden treadle wheel at the Dixie Classic Fair in NC and  the South Carolina State Fair in SC last month.  I have some new vases... some new faces... just fun stuff!


Stock... ready for the Fairs!

Come to my old high school, Northwestern Regional #7 in Winsted CT  for their Holiday Craft Fair, this Saturday, November 21st from 9-3. I will be in the New Gym. My minis sell for $4 each, but you can get a special of  3 for $10.  I will also have some bigger face jugs and a few yellow ware pieces. I do not sell at my shop in Torrington any longer, so this is your opportunity to pick up a lovely gift for you or someone else.

Hope to see you there!

Sunday, November 1, 2015

Stoorstalka.... Modern Band Looms for Every Day Use


I realize that not all weavers would like to have the old fashioned primitive wood carved band looms, but would prefer a modern loom. Stoorstalka in Sweden, makes lovely little acrylic modern looms that are small, lightweight and easy to carry around. They offer several sizes and styles along with a shuttle and threading tool. You can visit them at www.stoorstalka.com in Sweden or check out their American site... http://bandweaving.com/


I chose the medium size loom.  It is only 3 1/2" tall and 7" wide, with 64 threads, it accommodates any size stripe pattern and has room for a 17 thread pick-up pattern. The holes are 1/16", big enough for sport size yarns, embroidery floss and smaller threads. There also sell narrow and wide looms at a reasonable price.


For my first simple project, I used Prism skeins. These handy little skeins have 10 yards of cotton thread and are smooth and easy to work with.

The loom was easy to set up as I usually do, between my knees, but clamping it to a table or bookcase would make setting up easy too.


I made about a yard of band, a headband, bracelet and a ring in a pretty comb pattern. I was finishing up outside while at the South Carolina State Fair in Columbia SC and laid the finished band out on a bale of hay. These looms are so portable. I love the way I can take it to any event or vacation and work on bands like I work on my knitting.


My next stop after the South Carolina State Fair was Pigeon Forge TN. I stopped in at Dollywood to visit some fellow tradesmen.  October is Crafts month at Dollywood. I worked there for 2 weeks a few years ago and have many friends demonstrating their trades there.  I stopped in to see Rosie Dupuy the weaver. (http://www.applewoodhandwovens.com) Rosie weaves on larger looms and shares my enthusiasm for band looms.  She had recently bought a loom from Stoorstalka too. Rosie chose the double slotted loom. She said this loom separates the pick-up pattern threads and so is easier to see and operate.  I follow the traditional Norwegian style of single holes, but I can see why this style would be liked by many.   She attached her new Stoorstalka loom to a box that she had made for card loom weaving. Setting your loom in a cradle or box like Rosie is more bulky to carry around, but you can have a back beam for lots of contained warp and attach the front to your box. Adjusting the tension this way means you don't have to rely on tying to a hook on the wall and your body, leaving you free.


Rosie also purchased another pretty little modern loom. Made in Poland, it is available on this etsy site...
https://www.etsy.com/shop/FolkTalesPl?section_id=17484398&ref=shopsection_leftnav_2

This one is made of wood and comes in many attractive styles.


Check out the Stoorstalka and Etsy sites above for a nice modern loom. If you still need instruction and have not purchased my book, Tape Loom Weaving.... simplified, it is still available on Amazon and my web site, www.eastknollpottery.com

It is not too late to work on some Holiday presents!... Bookmarks, handy bags with matching woven handles, personalized headbands... check out my previous blogs above, just type in tape looms on the search bar to find free patterns, ideas and advice.

And Happy Weaving!


Monday, September 14, 2015

Classes in Tape/Band weaving Minnesota to Connecticut


I travel in the summer to teach and demonstrate clay and early pottery in Minnesota, Nebraska, Iowa, Wisconsin, New York, Massachusetts, the Carolina's and Connecticut. About 20 years ago, I took up Tape Loom Weaving as a break from doing pottery all day.  So now, I travel with my looms and a bunch of yarn and teach folks about weaving on this fun simple loom as I travel.

I have found many weaving enthusiasts along the way and many folks interested in learning this simple technique. It is so much more portable than the inkle looms and the results are the same. The simple ridgid heddle tape or band loom goes back to Medieval times across Europe.

There are so many styles of this beautiful loom too. They are simple and easy to make.


Ok, the loms above are not so easy to make. On a previous blog post, I show you some simple looms make from a pitchure frame.

This past Valentines day, Roger and I taught our first couples class at the Vesterheim Museum in Decorah, IA. Roger taught one of the partners to carve a loom, and I taught the other partner to weave on it. We all had a great time sharing, in the same room, our views on carving and weaving and the results were wonderful.


It went so well, there was a waiting list and the class will be offered again on Valentines day in February 2016 at the Vesterheim in Decorah.


Can't get to Decorah this February?  I will be teaching beginners basics and advanced pick-up patterns around New England again this winter.  I will be posting dates for classes at my shop in Torrington, Connecticut, but also at Historical Societies, Museums and Libraries. You can learn from my book, Tape Loom Weaving... simplified, available at my web site or Amazon, but coming to a class with others will be fun and I will get to meet some more great people.  

If you have a group of 6-8 people, I can come to your setting. You can get information on prices and times at my web site, www.eastknollpottery.com. It is best to contact me through emails. I will be traveling till the first of November and still do not have a cell phone!

Take a class! Folk schools, museums and libraries offer a variety of classes to break up our winter blues!

Wednesday, July 29, 2015

Adding an Extra Heddle to Create 3 "Heddles" on a Tape or Band Loom

Of course our tape loom with holes and slots only has 2 sheds, but we can make an extra heddle with the use of a large pin and a shed stick.

I mistakenly originally posted this as krokbragd. Finally, someone commented that krokbragd is a weft face weave. Please skip over any notations to krokbragd below.  But have fun putting in a third heddle. 

Anne Dixon wrote a wonderful book of 400 inkle loom patterns, The Weavers Inkle Pattern Directory. I wanted to try her pattern for a row of flowers on my gate style tape loom. 


 I drew up my pattern chart like I draw up my patterns for stripes.  Keep in mind there will be 3 sheds in a series of four rows.

You will also need a large safety pin and a pop stick with holes drilled in each end and a thread secured to one hole. (see below)

I then translated the pattern to a warping chart. H of course stands for Holes, S for slots, but here we must double up the slot row. There is a S2 and an S3. These two sheds will be divided later on.  All threads are single strands of the same weight. There are four blue border threads on each side that do not show on the S3 row below, because you will be using the same border threads from S2.  This pattern uses 13 holes and 13 slots but there will be a total of 35 threads.


Warp your loom as usual from left to right, blue hole, blue slot, blue hole, blue slot, blue hole, blue and red in the next slot and so on across the chart and loom.  Your warped slots will look like this:

For this pattern you will need 13 string heddles about 5" long. I tied up my loom to my back strap and put a string heddle on each of the 13 blue thread in the slots (including the two border threads on each end), just behind my loom. Then I put them on my big pin. This is S2 row on the chart above.


Next, I placed my pop stick behind the string heddles. Put the pop stick under the two blue ends, all the thread in S3 row and the two blue border threads on each end. Tie the stick's string over the new shed threads and tie to other end of the pop stick.


Wind your shuttle with blue and begin on the left side. Raise your loom and pass your shuttle through. 


Lower the loom and pull up the sting heddle. You may have to wiggle and tap the threads in front of the loom to get the slot threads to separate into two sheds. Slide your hand into this new shed and tamp tight with your hand and pass the shuttle.


Raise your loom and tamp this new shed with your hand, pass the shuttle.


Drop your loom and raise the pop stick shed. Again, you may have to wiggle and tap the shed in front of the loom to separate the two threads in the slots. Place your hand in this shed and tamp hard. Pass the shuttle.


That's it!  There is a four row series. H, S2, H, S3, repeat. For the best results, wiggle and tighten the weft rows and draw the warp threads together so the warp threads touch in the finished pattern showing no weft threads inside.

Are you a beginner to Tape and Band Weaving?  I wrote a book a couple of years ago... Tape Loom Weaving... simplified, that will show you the basics of band weaving, stripe patterns, warp floats and pick up pattern weaving, along with conversations from inkle patterns to tape and band looms.  

My book is available through Amazon.com or my web site www.eastknollpottery.com  and check out this blog for other patterns, tips and tools for weaving using my search band above.

I also have a pinterest page with scores of patterns and looms for you to goggle over! www.pinterest.com/potterymom1   

And... have fun!

Thursday, May 28, 2015

Miniature Vases for Flower Arrangements


Fair season is about to start in Minnesota!  Like most fairs, Minnesota has flower arrangement contests. I have just the thing for the Miniature Arrangements that are so fun and popular at the fairs.

These little vases below are only about 2" tall. All of the real flower were collected in my yard.

Miniature flower arrangements

Miniature flower arrangements


You can see me demonstrating how they are made on my foot powered treadle wheel at a number of fairs this summer.  I make thousands of little pots to demonstrate a variety of clays, glazes and decoration and offer them to fair goers for only $4. Or go for the fair special of 3 for $10 and make a nice grouping like I did.  For a list of my demonstrations, check out my web site www.eastknollpottery.com and click on my Demonstrations tab.

So come see them being made, pick out a special one... or three, and make a little arrangement of your own.


Sunday, May 3, 2015

Sgraffito... Norwegian style


I am soon off to the Mid-western part of the USA to demonstrate and teach Early American Pottery for 3 months.  I specialize in Yellow Ware, but this is hard to do on the road, as I need a lathe to decorate the feathering patterns, that would be too much to cart around. So I work a lot in miniature and demonstrate pottery by small "samples".  I especially like tiny face jugs as my fair-goers do.

The mid-west in the 1800s, was populated by a lot of Scandinavians and Germans. The Germans have kept a low profile due to the wars going on in Europe in the early 1900s. My own great grandfather came from Germany to New York City in the late 1800s.  And it was the Germans who brought over the Sgraffito style of pottery to the USA.

Sgraffito is an old style of pottery decoration.  It developed in several places in Europe at the same time. In the 1600s, potters all over Europe began to decorate their simple utilitarian clay pot with colored clays called slips.  Clay comes in shades of red, yellow and white, but it can also be colored by adding oxides. Cobalt will create shades of blue, chrome shades of green.  Their were several ways to decorate with these colors. Slip can be painted and "trailed" onto wares with a quill cup, applied with a sponge or a coat of color applied and decorations scratched through this top layer of color to show the clay color underneath... Sgraffito.

Germans coming to America in the 1600s brought trailing and sgraffito styles. They settled in Pennsylvania and many of our antique sgraffito pots can be traced to that area.  Here in New England... not so much. New England was settled early by the English and although the English did sgraffito work back in England in the 1600s, they did little work in sgraffito here.  You can find many trailed patterns from early New England. Our own local potter, Hervey Brooks from Goshen CT, did some slip trailed plates. Along the Connecticut shore, potters decorated with slips having the influence of those New York city immigrants nearby.

Midwesterners however, got a late start.  Immigrants brought some pottery with them as they settled out west, but by the mid 1800s, pottery was taking a major turn. Our roads were improving and the railroad was being laid out connecting all parts of the country by an effective means of transporting clay and the finished pottery.

Industrialization.  Now potters built factories and hired unskilled labor to mass produce pottery. Those simple red clay pots were replaced by china dishes and stoneware crocks.  The small potters careers were basically over.

Joseph Pohl came to Minnesota in the 1860s and made red ware pots from the clay on his property. He used a simple treadle wheel and sold his utilitarian bake ware and flower pots to the locals. But less than 10 years later, Red Wing pottery opened its major operation nearby. They would manufacture thousands of crocks and dishes.

So the art of Sgraffito stayed mostly in Pennsylvania where it is still made and sought after today.


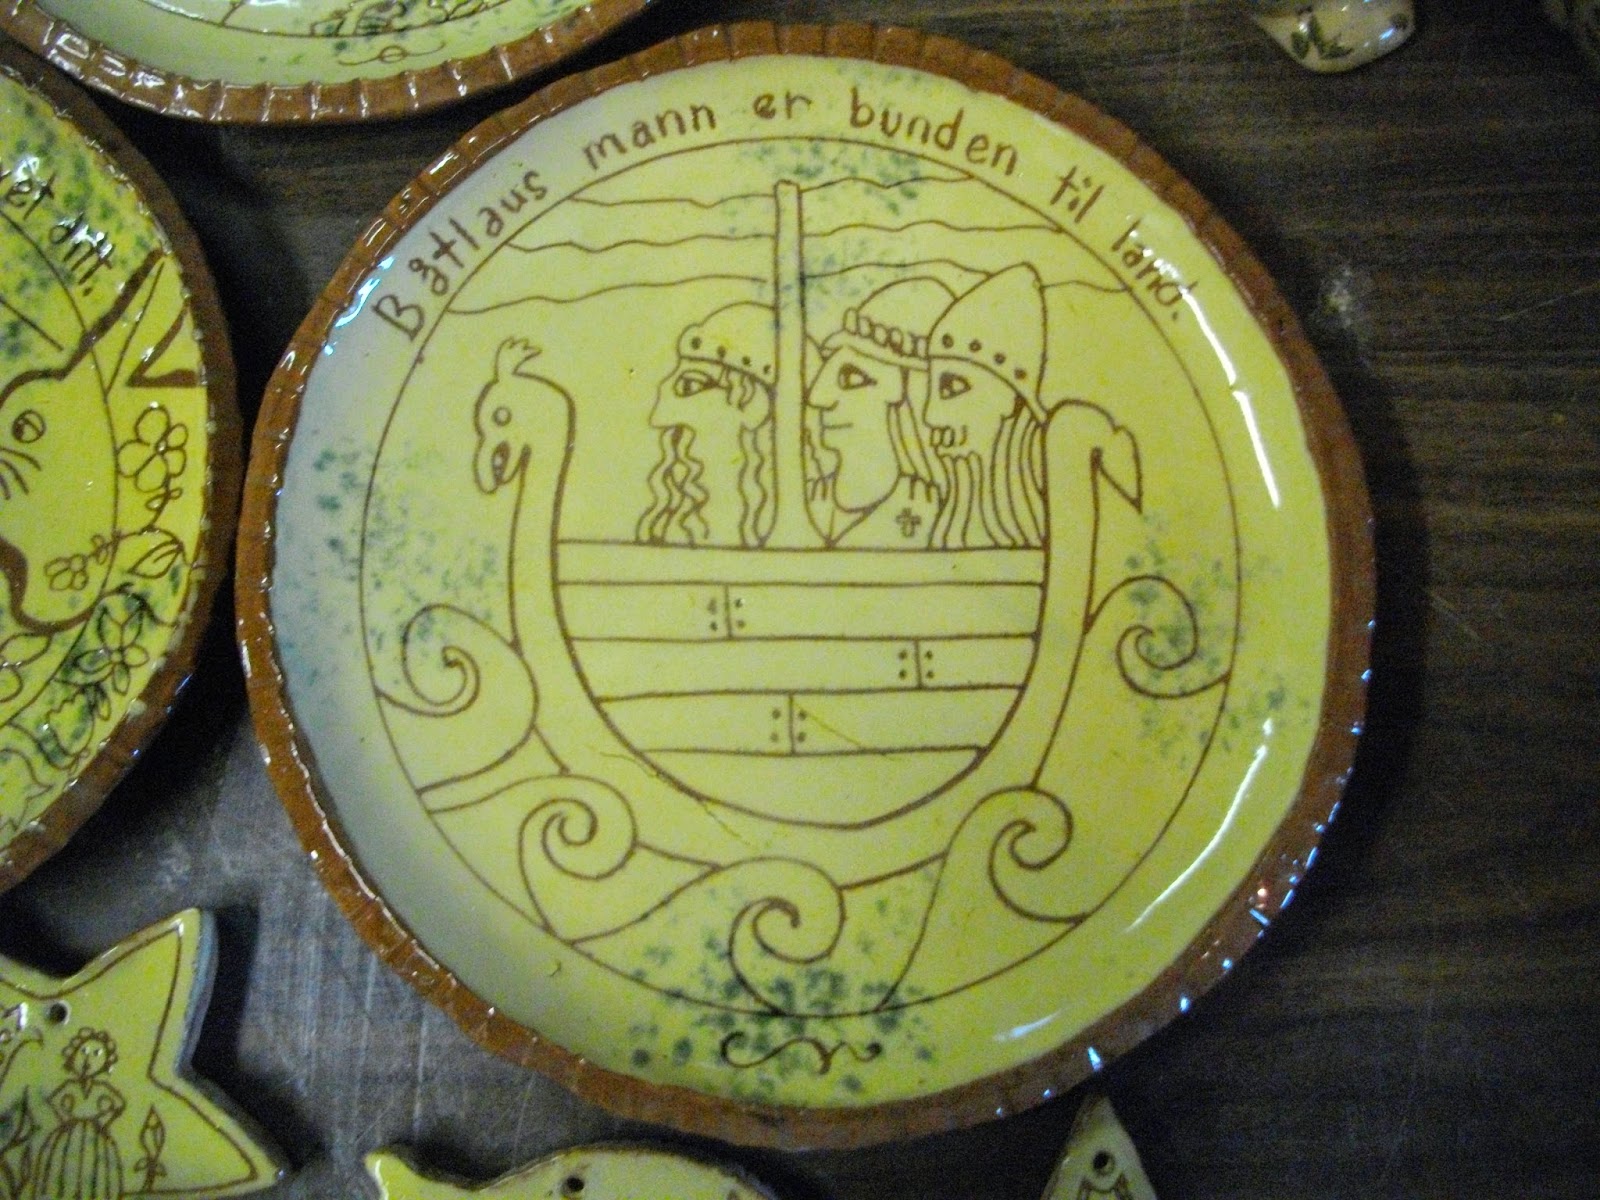
I am working out some classes in Minnesota.  I would like to bring to the German and Scandinavian descendant's any other nationality, the wonderful art of Sgraffito.  The two plates above have my new Norwegian flavor. Red clay is rolled out and placed over a plaster bat to firm up.  In the "old" days, white clay slip would be applied to the plate, the design scratched into the white to expose the red clay underneath and a coating of lead glazed applied.  When fired in the kiln, the lead and oxides in the clay would turn the white slip to a lovely yellow.  Nowadays, we can use lead free glazes, but we must tint the white clay yellow with oxides to replicate the old wares.  A dab of copper green is applied for variation.

The Norwegian themes of Vikings, boats and the fairy tale of Billy Goat Gruff and the troll work up nicely.


Students in my class will make up some cookie cutter ornaments to practice the technique.  Then they will be working up plates with drawings of their own creation.  Below are a couple of other examples. For those who may think they are not artistic, the cookie cutter rabbits (or other shapes) can be traced and embellished to create a pleasing plate.


Anyone wishing to learn more about taking a class in the art of Sgraffito can contact me on this blog or www.eastknollpottery.com

Come and try out a wonderful old style of pottery decoration and create an heirloom for future generations!